Archive
Automate deployment from CloudBees / Jenkins to Amazon Beanstalk
In my latest post about Amazon Beanstalk I explained how to deploy to Amazon Beanstalk in 3 simple steps. Of course this a manual activity. We often deploy new versions of apps to Amazon Beanstalk, so it is a ‘must have’ to automate this proces.
Amazon delivers the AWS SDK for Java API to access Amazon Beanstalk. Lets investigate what we need.
We use the AWSCredentials interface from the com.amazonaws.auth package, to login with the AWS credentials.
To access the Amazon S3 we use the AmazonS3 interface and the AmazonS3Client class from the com.amazonaws.services.s3 package.
We use the AWSElasticBeanstalk interface and the AWSElasticBeanstalkClient class from the com.amazonaws.services.elasticbeanstalk package, to use the following methods:
- deleteApplicationVersion – Deletes the specified version from the specified application.
- createStorageLocation – Creates the Amazon S3 storage location for the account, to upload the WAR.
- createApplicationVersion – Creates an application version for the specified application.
- updateEnvironment – Updates the environment description, deploys a new application version, updates the configuration settings to an entirely new configuration template, or updates select configuration option values in the running environment.
- DeleteApplicationVersionRequest – Deletes the specified version from the specified application.
- S3Location – A specification of a location in Amazon S3.
- CreateApplicationVersionRequest – Creates an application version for the specified application.
- UpdateEnvironmentRequest – Updates the environment description, deploys a new application version, updates the configuration settings to an entirely new configuration template, or updates select configuration option values in the running environment.
- DescribeEnvironmentsRequest – Returns descriptions for existing environments.
- DescribeApplicationVersionsRequest – Returns descriptions for existing application versions.
Lets make a script using the Groovy language:
import com.amazonaws.auth.*
import com.amazonaws.services.s3.*
import com.amazonaws.services.elasticbeanstalk.*
import com.amazonaws.services.elasticbeanstalk.model.*

target(deployBeanstalk: 'Deploy to AWS Beanstalk') {
 // Check existing version and check if environment is production
 depends(checkExistingAppVersion, prodEnviroment, war)

 // Log on to AWS with your credentials
 def credentials = credentials
 AmazonS3 s3 = new AmazonS3Client(credentials)
 AWSElasticBeanstalk elasticBeanstalk = new AWSElasticBeanstalkClient(credentials)

 // Delete existing application
 if (applicationVersionAlreadyExists(elasticBeanstalk)) {
 println "Delete existing application version"
 def deleteRequest = new DeleteApplicationVersionRequest(applicationName:     applicationName,
 versionLabel: versionLabel, deleteSourceBundle: true)
 elasticBeanstalk.deleteApplicationVersion(deleteRequest)
 }

 // Upload a WAR file to Amazon S3
 println "Uploading application to Amazon S3"
 def warFile = projectWarFilename
 String bucketName = elasticBeanstalk.createStorageLocation().getS3Bucket()
 String key = URLEncoder.encode(warFile.name, 'UTF-8')
 def s3Result = s3.putObject(bucketName, key, warFile)
 println "Uploaded application $s3Result.versionId"

 // Register a new application version
 println "Create application version with uploaded application"
 def createApplicationRequest = new CreateApplicationVersionRequest(
 applicationName: applicationName, versionLabel: versionLabel,
 description: description,
 autoCreateApplication: true, sourceBundle: new S3Location(bucketName, key)
 )
 def createApplicationVersionResult = elasticBeanstalk.createApplicationVersion(createApplicationRequest)
 println "Registered application version $createApplicationVersionResult"

 // Deploy the new version to an existing environment
 // If you don't have any AWS Elastic Beanstalk environments yet, you
 // can easily create one with with:
 // The AWS Management Console - http://console.aws.amazon.com/elasticbeanstalk
 // The AWS Toolkit for Eclipse - http://aws.amazon.com/eclipse
 // The Elastic Beanstalk CLI - http://aws.amazon.com/elasticbeanstalk
 println "Update environment with uploaded application version"
 def updateEnviromentRequest = new UpdateEnvironmentRequest(environmentName:  environmentName, versionLabel: versionLabel)
 def updateEnviromentResult = elasticBeanstalk.updateEnvironment(updateEnviromentRequest)
 println "Updated environment $updateEnviromentResult"
}
From CloudBees / Jenkins we make a separate build job ‘Deployment_Amazon’ where we can easily put the Grails command line to execute the above script.
So we have seen in this post that we can easy setup a Build environment using CloudBees / Jenkins and Deploy automatically via the ‘AWS SDK for Java API’ to Amazon Beanstalk. Lets enjoy Develop, Build and Deploy in the Cloud!
*** Update ***
Hereby the complete script with the private functions. Just add this script right after the above script. Fill in own credentials(access- and secretkey, application- and environmentname. Succes.
setDefaultTarget(deployBeanstalk)

private boolean applicationVersionIsDeployed(elasticBeanstalk) {
    def search = new DescribeEnvironmentsRequest(applicationName: applicationName, versionLabel: versionLabel)
    def result = elasticBeanstalk.describeEnvironments(search)
    !result.environments.empty
}

private boolean applicationVersionAlreadyExists(elasticBeanstalk) {
    def search = new DescribeApplicationVersionsRequest(applicationName: applicationName, versionLabels: [versionLabel])
    def result = elasticBeanstalk.describeApplicationVersions(search)
    !result.applicationVersions.empty
}

private AWSCredentials getCredentials() {
    def accessKey = '@@@@@@@@@@@@@@@'
    def secretKey = '@@@@@@@@@@@@@@@@@@@@@@@@@@@@@@@@@@@@@'
    def credentials = new BasicAWSCredentials(accessKey, secretKey)
    credentials
}

private String getApplicationName() {
    '@@@@@@@@'
}

private String getEnvironmentName() {
    '@@@@@@@@'
}

private String getDescription() {
    applicationName + " via 'grails deploy-beanstalk' build on ${new Date().format('yyyy-MM-dd')}"
}

private String getVersionLabel() {
    def applicationVersion = metadata.getApplicationVersion()
    applicationVersion + '-production'
}

private File getProjectWarFilename() {
    new File(basedir, 'target/scs-' + versionLabel + '.war')
}
Deploy Grails Apps in 3 simple steps to Amazon Beanstalk
We can easy deploy the Grails WAR file to Amazon Beanstalk in 3 simple steps:
- We have to create an Amazon Web Services Account (this part is not described is this post)
- We have to make a MySQL database. We use Amazon RDS
- We have to make the Amazon Elastic Beanstalk and deploy the WAR
Important note before you start!
We need security groups, to connect local client tools and Amazon Elastic Beanstalk to the MySQL Database Instance. To succeed to make this connection it is important to install Amazon RDS and Amazon Elastic Beanstalk in the same region. At this moment you can choose only select one region for setting up Amazon Elastic Beanstalk (US East) so your region for Amazon RDS must be ‘US East’.
Make MySQL Database Instance with Amazon RDS
1) Sign in to the AWS Management Console and choose for the RDS tab
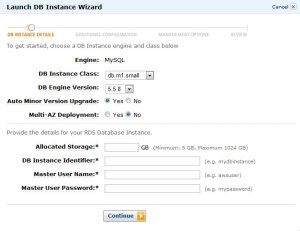
2) Press the Launch DB Instance Button
You see the first screen. In our case we fill in the following:
Allocated Storage: 5
DB Instance Identifier: db
Master User Name: root
Master User Password: mysql
The other fields will have the default value
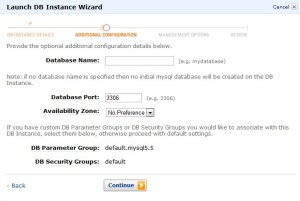
3) In the second screen you can enter some additional configuration
Database name: database
The other fields will have the default value
4) In the other screen you can enter some management options like backup scedule etc.
5) After you review all the info and pressing the Launch button you get an available MySQL Database Instance!
Fill in the DB security group to authorize access from local client tools and elastic beanstalk
Enter in the default security group:
1) a CIDR/IP connection type with IP/32 of the machine with client tools. Fill in your IP, to haven direct access with your own client tools
2) a EC2 Security Group type with Security Group:elasticbeanstalk-default and enter your AWS Account ID
Make the elastic beanstalk and deploy the Grails WAR
1) We use the production evironment option in the datasource.groovy to put in the Amazon information. Use the endpoint of the Amazon RDS / MySQL Database Instance as the machinename and the Amazon Beanstalk environment in the jdbc connection.
production {
        dataSource {
            pooled = true
            driverClassName = "com.mysql.jdbc.Driver"
            dbCreate = "update" // one of 'create', 'create-drop','update'
            username = 'root'
            password = 'mysql'
            url = 'jdbc:mysql://'endpoint':3306/'environment''
            dialect = org.hibernate.dialect.MySQL5InnoDBDialect
            properties {
                validationQuery = "SELECT 1"
                testOnBorrow = true
                testOnReturn = true
                testWhileIdle = true
                timeBetweenEvictionRunsMillis = 1000 * 60 * 30
                numTestsPerEvictionRun = 3
                minEvictableIdleTimeMillis = 1000 * 60 * 30
            }
        }
    }
2) Create the Grails WAR with the correct datasource.groovy file.
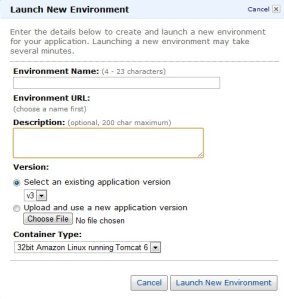
Enter an environment is our case : environment
Upload a Grails WAR file: appname.war
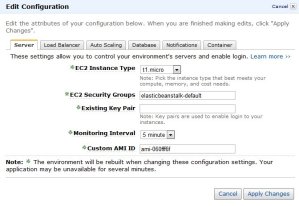
You can edit your environment. See the manual Elastic Beanstalk guide
After successfully upload en deploy of the Grails WAR file you see a little green square!
At this point you have successfully upload and deploy your Grails App to the Amazon Cloud!!!
Look at http://environment.elasticbeanstalk.com/ and enjoy!!!


