Archive
Automate deployment from CloudBees / Jenkins to Amazon Beanstalk
In my latest post about Amazon Beanstalk I explained how to deploy to Amazon Beanstalk in 3 simple steps. Of course this a manual activity. We often deploy new versions of apps to Amazon Beanstalk, so it is a ‘must have’ to automate this proces.
Amazon delivers the AWS SDK for Java API to access Amazon Beanstalk. Lets investigate what we need.
We use the AWSCredentials interface from the com.amazonaws.auth package, to login with the AWS credentials.
To access the Amazon S3 we use the AmazonS3 interface and the AmazonS3Client class from the com.amazonaws.services.s3 package.
We use the AWSElasticBeanstalk interface and the AWSElasticBeanstalkClient class from the com.amazonaws.services.elasticbeanstalk package, to use the following methods:
- deleteApplicationVersion – Deletes the specified version from the specified application.
- createStorageLocation – Creates the Amazon S3 storage location for the account, to upload the WAR.
- createApplicationVersion – Creates an application version for the specified application.
- updateEnvironment – Updates the environment description, deploys a new application version, updates the configuration settings to an entirely new configuration template, or updates select configuration option values in the running environment.
- DeleteApplicationVersionRequest – Deletes the specified version from the specified application.
- S3Location – A specification of a location in Amazon S3.
- CreateApplicationVersionRequest – Creates an application version for the specified application.
- UpdateEnvironmentRequest – Updates the environment description, deploys a new application version, updates the configuration settings to an entirely new configuration template, or updates select configuration option values in the running environment.
- DescribeEnvironmentsRequest – Returns descriptions for existing environments.
- DescribeApplicationVersionsRequest – Returns descriptions for existing application versions.
Lets make a script using the Groovy language:
import com.amazonaws.auth.*
import com.amazonaws.services.s3.*
import com.amazonaws.services.elasticbeanstalk.*
import com.amazonaws.services.elasticbeanstalk.model.*

target(deployBeanstalk: 'Deploy to AWS Beanstalk') {
 // Check existing version and check if environment is production
 depends(checkExistingAppVersion, prodEnviroment, war)

 // Log on to AWS with your credentials
 def credentials = credentials
 AmazonS3 s3 = new AmazonS3Client(credentials)
 AWSElasticBeanstalk elasticBeanstalk = new AWSElasticBeanstalkClient(credentials)

 // Delete existing application
 if (applicationVersionAlreadyExists(elasticBeanstalk)) {
 println "Delete existing application version"
 def deleteRequest = new DeleteApplicationVersionRequest(applicationName:     applicationName,
 versionLabel: versionLabel, deleteSourceBundle: true)
 elasticBeanstalk.deleteApplicationVersion(deleteRequest)
 }

 // Upload a WAR file to Amazon S3
 println "Uploading application to Amazon S3"
 def warFile = projectWarFilename
 String bucketName = elasticBeanstalk.createStorageLocation().getS3Bucket()
 String key = URLEncoder.encode(warFile.name, 'UTF-8')
 def s3Result = s3.putObject(bucketName, key, warFile)
 println "Uploaded application $s3Result.versionId"

 // Register a new application version
 println "Create application version with uploaded application"
 def createApplicationRequest = new CreateApplicationVersionRequest(
 applicationName: applicationName, versionLabel: versionLabel,
 description: description,
 autoCreateApplication: true, sourceBundle: new S3Location(bucketName, key)
 )
 def createApplicationVersionResult = elasticBeanstalk.createApplicationVersion(createApplicationRequest)
 println "Registered application version $createApplicationVersionResult"

 // Deploy the new version to an existing environment
 // If you don't have any AWS Elastic Beanstalk environments yet, you
 // can easily create one with with:
 // The AWS Management Console - http://console.aws.amazon.com/elasticbeanstalk
 // The AWS Toolkit for Eclipse - http://aws.amazon.com/eclipse
 // The Elastic Beanstalk CLI - http://aws.amazon.com/elasticbeanstalk
 println "Update environment with uploaded application version"
 def updateEnviromentRequest = new UpdateEnvironmentRequest(environmentName:  environmentName, versionLabel: versionLabel)
 def updateEnviromentResult = elasticBeanstalk.updateEnvironment(updateEnviromentRequest)
 println "Updated environment $updateEnviromentResult"
}
From CloudBees / Jenkins we make a separate build job ‘Deployment_Amazon’ where we can easily put the Grails command line to execute the above script.
So we have seen in this post that we can easy setup a Build environment using CloudBees / Jenkins and Deploy automatically via the ‘AWS SDK for Java API’ to Amazon Beanstalk. Lets enjoy Develop, Build and Deploy in the Cloud!
*** Update ***
Hereby the complete script with the private functions. Just add this script right after the above script. Fill in own credentials(access- and secretkey, application- and environmentname. Succes.
setDefaultTarget(deployBeanstalk)

private boolean applicationVersionIsDeployed(elasticBeanstalk) {
    def search = new DescribeEnvironmentsRequest(applicationName: applicationName, versionLabel: versionLabel)
    def result = elasticBeanstalk.describeEnvironments(search)
    !result.environments.empty
}

private boolean applicationVersionAlreadyExists(elasticBeanstalk) {
    def search = new DescribeApplicationVersionsRequest(applicationName: applicationName, versionLabels: [versionLabel])
    def result = elasticBeanstalk.describeApplicationVersions(search)
    !result.applicationVersions.empty
}

private AWSCredentials getCredentials() {
    def accessKey = '@@@@@@@@@@@@@@@'
    def secretKey = '@@@@@@@@@@@@@@@@@@@@@@@@@@@@@@@@@@@@@'
    def credentials = new BasicAWSCredentials(accessKey, secretKey)
    credentials
}

private String getApplicationName() {
    '@@@@@@@@'
}

private String getEnvironmentName() {
    '@@@@@@@@'
}

private String getDescription() {
    applicationName + " via 'grails deploy-beanstalk' build on ${new Date().format('yyyy-MM-dd')}"
}

private String getVersionLabel() {
    def applicationVersion = metadata.getApplicationVersion()
    applicationVersion + '-production'
}

private File getProjectWarFilename() {
    new File(basedir, 'target/scs-' + versionLabel + '.war')
}
Continuous deployment Grails Apps with Cloudbees Jenkins GitHub
After deploying Grails Apps to Amazon Beanstalk, it’s now time to look at CloudBees. At the moment CloudBees offers the only Platform as a Service (PaaS) that spans the complete develop-to-deploy lifecycle of Java web applications in the cloud; without any servers, any virtual machines or any IT staff. See the Cloudbees website for more info. For a random Grails App named ‘KnowledgeMatch’ we follow some simple steps:
- Sign up to CloudBees (RUN@Cloud is free and there is a free plan for DEV@Cloud) (this step is not described in this post)
- Install and configure Jenkins plugins (DEV@Cloud)
- Configure a new Jenkins job (DEV@Cloud)
- We make a change to our source code repo in GitHub and see if it all works
Go to Manage Jenkins > Configure System. At the CloudBees area fill in your API- and Secret Key. Just click the question mark and copy and paste those fields.
Now its time to configure a new Jenkins job. Choose a JDK version. In the source code management area choose for the ‘Git’option. Copy the Publickey and goto to you Github > Account settings and make a new SSH Public Key and call it for example ‘CloudBees’.
At the build triggers area. Choose for ‘Poll SCM’ and fill in ‘* * * * * ‘ which mean every minute. You can change this to every poll schedule you need. See question mark for examples.
In the build area press the button ‘Add build step’ and choose ‘Build With Grails‘. Now fill in the grails version (in our case 1.3.6) and type in the target field your grails command: clean “war target/knowledgematch.war“. Also I checked the field ‘force upgrade’
And finnaly in the post-build action area. We fill in:
Archive the artifacts : target/knowledgematch.war
Email notification: malderhout@gmail.com
Cloudbees Deployment
- Cloudbees Site : maikel
- Application ID: maikel/knowledgematch
- Filename Pattern: target/knowledgematch.war
In GitHub we change the domain class kandidaat.groovy. This domain class has a default controller wit scaffolding implemented.
class Kandidaat
 String Name
 String Adres
 Date BirthDate

 static constraints = {}
Now lets look at the DEV@Cloud / Jenkins Dashboard if the job is starting.
Yes, the job is start the building proces.
Now we look at RUN@Cloud if the WAR file is deployed.

Yes the WAR file is deployed. Lets look at http://knowledgematch.maikel.cloudbees.net/kandidaat/create if the Grails App is available.

Yess!!!
Conclusion
CloudBees use the underlying Amazon platform. Tomcat is used as Java container and MySQL is used as database. There is direct access with local MySQL tools to restore data.
CloudBees RUN@Cloud is a serious alternative to Amazon Elastic Beanstalk and RDS. Cloudbees is cheaper and is easier to use. The combination DEV@Cloud and RUN@Cloud is a really good platform to automate the (Agile) software development proces.
Implement Business Rules using Grails (Part 1)
General
Implementing business rules can be a tedious and error-prone task in application development. Business rules are often ambiguously defined and recorded. Since implementing business rules is usually a major task in each project, this can introduce a significant risk to the success of your Grails application.
We assume the following three main types of business rules:
- constraint rules
- change event rules
- authorization rules
Constraint rules define a restriction to the state of the system or the change of the system state. Change event rules define automatic actions triggered by a change to the system state. The automatic action can either be a change in data (insert, update, delete) or an action outside the database such as sending e-mail or printing a report. Authorization rules define a restriction on the authorized use of the system. A very good blogpost to implement the Spring Security Plugin is described here: http://blog.springsource.com/2010/08/11/simplified-spring-security-with-grails/
Contraint rules
Constraint rules define a restriction to the state of the system or to allowed changes in the system state. Restrictions to the state of system are known as Invariants. Restrictions to the allowed changes to the system state are known as PreConditions. PreConditions can only be checked when actually performing the change to the data since they are checking whether the change itself is allowed. Invariants can be checked as you perform an action, but can also be checked against existing system objects.
The following subtypes of constraint rules can be identified:
- Attribute
- Instance
- Entity
- Inter Entity
Classifying the rules into the above subcategories is quite simple, since it is very easy to see if the rule involves:
- Only one attribute in one entity object instance (Attribute)
- Two or more attributes in the same instance (Instance)
- More than one instance of the same entity object (Entity)
- More than one instance across multiple entity objects (Inter Entity)
Essentially this subdivision is in increasing order of complexity. When estimating the time it will take to implement a given rule, take into account that Attribute rules are relatively easy to implement, instance rules are more difficult, and so forth.
Lets implement two examples in Grails using custom validators.
Attribute Rules
An Attribute Rule defines which values are allowed for an attribute.
Code example: Date must be in the future
date(validator: {it <= new Date()})
Instance Rules
Instance Rules depend on the value of two or more attributes within the same entity
object instance.
Code example: End Date must be after the start date
 static constraints = {
        startDate(nullable: true)
        endDate(nullable: true, validator: { endDate, instance ->
            if (endDate && endDate < instance.startDate) {
                return 'validation.period.endDate.greater.than.startDate'
            }
        })
}
This example appears often in several domain objects an of course is much better to install the constraints plugin, to put this constraint in it’s own class and re-use it in the domain objects. So we don’t have to repeat ourselves and prevent code duplication.
Next time we look at the more difficult constraints Entity- and Inter Entity constraints.
Deploy Grails Apps in 3 simple steps to Amazon Beanstalk
We can easy deploy the Grails WAR file to Amazon Beanstalk in 3 simple steps:
- We have to create an Amazon Web Services Account (this part is not described is this post)
- We have to make a MySQL database. We use Amazon RDS
- We have to make the Amazon Elastic Beanstalk and deploy the WAR
Important note before you start!
We need security groups, to connect local client tools and Amazon Elastic Beanstalk to the MySQL Database Instance. To succeed to make this connection it is important to install Amazon RDS and Amazon Elastic Beanstalk in the same region. At this moment you can choose only select one region for setting up Amazon Elastic Beanstalk (US East) so your region for Amazon RDS must be ‘US East’.
Make MySQL Database Instance with Amazon RDS
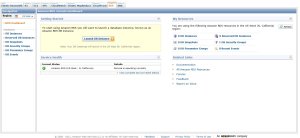
1) Sign in to the AWS Management Console and choose for the RDS tab
2) Press the Launch DB Instance Button
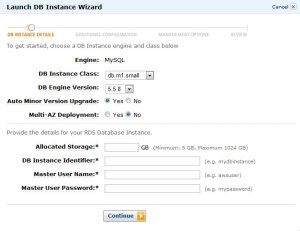
You see the first screen. In our case we fill in the following:
Allocated Storage: 5
DB Instance Identifier: db
Master User Name: root
Master User Password: mysql
The other fields will have the default value
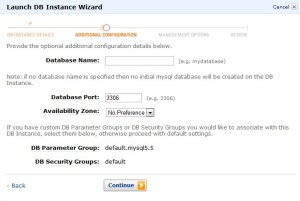
3) In the second screen you can enter some additional configuration
Database name: database
The other fields will have the default value
4) In the other screen you can enter some management options like backup scedule etc.
5) After you review all the info and pressing the Launch button you get an available MySQL Database Instance!
Fill in the DB security group to authorize access from local client tools and elastic beanstalk
Enter in the default security group:
1) a CIDR/IP connection type with IP/32 of the machine with client tools. Fill in your IP, to haven direct access with your own client tools
2) a EC2 Security Group type with Security Group:elasticbeanstalk-default and enter your AWS Account ID
Make the elastic beanstalk and deploy the Grails WAR
1) We use the production evironment option in the datasource.groovy to put in the Amazon information. Use the endpoint of the Amazon RDS / MySQL Database Instance as the machinename and the Amazon Beanstalk environment in the jdbc connection.
production {
        dataSource {
            pooled = true
            driverClassName = "com.mysql.jdbc.Driver"
            dbCreate = "update" // one of 'create', 'create-drop','update'
            username = 'root'
            password = 'mysql'
            url = 'jdbc:mysql://'endpoint':3306/'environment''
            dialect = org.hibernate.dialect.MySQL5InnoDBDialect
            properties {
                validationQuery = "SELECT 1"
                testOnBorrow = true
                testOnReturn = true
                testWhileIdle = true
                timeBetweenEvictionRunsMillis = 1000 * 60 * 30
                numTestsPerEvictionRun = 3
                minEvictableIdleTimeMillis = 1000 * 60 * 30
            }
        }
    }
2) Create the Grails WAR with the correct datasource.groovy file.
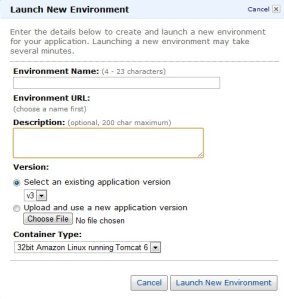
Enter an environment is our case : environment
Upload a Grails WAR file: appname.war
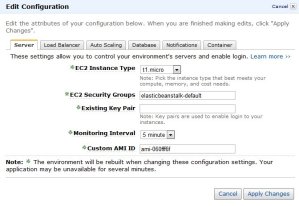
You can edit your environment. See the manual Elastic Beanstalk guide
After successfully upload en deploy of the Grails WAR file you see a little green square!
At this point you have successfully upload and deploy your Grails App to the Amazon Cloud!!!
Look at http://environment.elasticbeanstalk.com/ and enjoy!!!
Deploy Grails Apps in 3 simple steps on Tomcat and MySQL
For a Grails project we use Tomcat for our demo environment on Windows. Our Grails App is using MySQL as datasource. Here are 3 simple steps to get your Grails Apps deployed.
Needed Software
- Java JRE version (We assume you have already Java installed, so that you can skip this step). If not download and install
- WampServer 2.1e (32 bits) of WampServer 2.1d (64 bits) download
- Tomcat version 7.0.6. download
- And of course you need the Grails war file and probably some db scripts for MySQL database
Step 1 Installing WampServer
The WampServer package is delivered whith the latest releases of Apache, MySQL and PHP. Double click on the downloaded file and just follow the instructions. Everything is automatic. Once WampServer is installed, you can run some create- or datascripts to MySQL with the known phpMyAdmin tool. IMPORTANT: If port 80 is already in use, you can change the port in the httpd.conf file. Test if the url http://localhost/ is ok. Or if you change the port for example use http://localhost:99/
Step 2 Installing Tomcat
Installing Tomcat on Windows can be done easily using the Windows installer. Its interface and functionality is similar to other wizard based installers, with only a few items of interest. Installation as a service: Tomcat will be installed as a Windows service no matter what setting is selected. The installer will use the registry or the JAVA_HOME environment variable to determine the base path of a Java JRE. The installer will create shortcuts allowing starting and configuring Tomcat. It is important to note that the Tomcat administration web application can only be used when Tomcat is running. If port 8080 is already in use you can change this during the install or later in the server.xml file in the Tomcat/conf directory. Test if the url http://localhost:8080/ is ok. Or if you change the port for example use http://localhost:8099/
Step 3 Deploy the Grails war file
- Start Tomcat with the url http://localhost:8080/ or another port
- Click on manager webapp and logon
- Choose the file to select the Grails war file and click deploy
- If succes, the application must appear in the list and is started
- check this on http://localhost:8080/<appname>
Congratulations your Grails App is deployed now!
FAQ
Q: Portnumber is already in use?
A: Change in httpd.conf in case of Apache, change in server.xml in case of Tomcat
Q: Get errors during phpMyAdmin because sql file is greater than 2MB?
A: change the value of parameter upload_max_filesize for exapmple to 4MB
Q: Tomcat in log files out of PermSize?
A: On commandline use for example C:\Program Files\Apache Software Foundation\Tomcat 7.0\bin>tomcat7 //US//Tomcat7 –JvmMx 1024 ++JvmOptions=”-XX:MaxPermSize=512m” to set the MaxPermSize to 512m
Goto to the blog of mrhaki to read the artikels in Grails Goodness regarding Grails WAR files in combination with Tomcat


